Day 32 Task: Working with Namespaces and Services in Kubernetes.
Hey there! I am Pradeep Chitroliya I am a Devops engineer, started writing articles on my DevOps and cloud journey. My purpose is to share the concepts that I learn, the projects that I build, and the tasks that I perform regarding DevOps. Hope you all find it useful.
1. What is Namespace and how to work in kubernets.
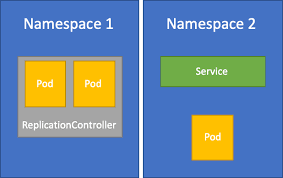
In Kubernetes, namespaces provides a mechanism for isolating groups of resources within a single cluster. Names of resources need to be unique within a namespace, but not across namespaces. Namespace-based scoping is applicable only for namespaced objects (e.g. Deployments, Services, etc) and not for cluster-wide objects (e.g. StorageClass, Nodes, PersistentVolumes, etc).
- Initial namespaces
Kubernetes starts with four initial namespaces:
we can see the namepace in kubernetes culster
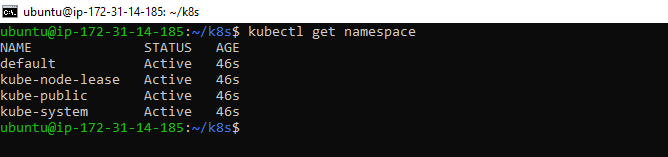
1. Default
Kubernetes includes this namespace so that you can start using your new cluster without first creating a namespace.
- kube-node-lease
This namespace holds Lease objects associated with each node. Node leases allow the kubelet to send heartbeats so that the control plane can detect node failure.
3. kube-public
This namespace is readable by all clients (including those not authenticated). This namespace is mostly reserved for cluster usage, in case that some resources should be visible and readable publicly throughout the whole cluster. The public aspect of this namespace is only a convention, not a requirement.
4.kube-system
The namespace for objects created by the Kubernetes system.
Task 1:
1. Create a Namespace for your Deployment
we can create namespace using the command below mention
# kubectl create namesapce <namespace name>
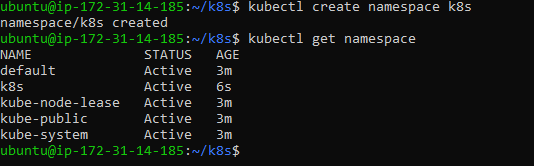
2. Update the deployment.yml file to include the Namespace
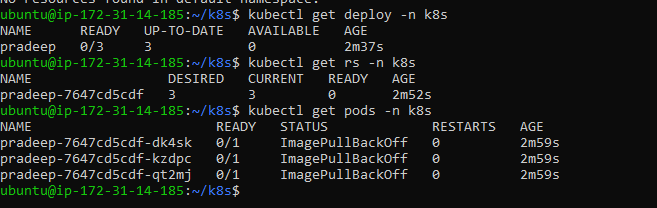
we want to create a deployment creaet in particuler namepscae.so firstl we have write a deployment yml file for deployment.
- Apply the updated deployment using the command:
kubectl apply -f deployment.yml -n <namespace-name>

we can see that have create deployment in particular namespace

3.Verify that the Namespace has been created by checking the status of the Namespaces in your cluster.
Task 2:
;Read about Services, Load Balancing, and Networking in Kubernetes
1. What is service in kubernetes and how to work
The Kubernetes network model
Every Pod in a cluster gets its own unique cluster-wide IP address. This means you do not need to explicitly create links between Pods and you almost never need to deal with mapping container ports to host ports.
This creates a clean, backwards-compatible model where Pods can be treated much like VMs or physical hosts from the perspectives of port allocation, naming, service discovery, load balancing, application configuration, and migration.
Service
Expose an application running in your cluster behind a single outward-facing endpoint, even when the workload is split across multiple backends.
Ingress
Make your HTTP (or HTTPS) network service available using a protocol-aware configuration mechanism, that understands web concepts like URIs, hostnames, paths, and more. The Ingress concept lets you map traffic to different backends based on rules you define via the Kubernetes API.
Ingress Controllers
In order for an Ingress to work in your cluster, there must be an ingress controller running. You need to select at least one ingress controller and make sure it is set up in your cluster. This page lists common ingress controllers that you can deploy.
Gateway API
Gateway API is a family of API kinds that provide dynamic infrastructure provisioning and advanced traffic routing.
EndpointSlices
The EndpointSlice API is the mechanism that Kubernetes uses to let your Service scale to handle large numbers of backends, and allows the cluster to update its list of healthy backends efficiently.
Network Policies
If you want to control traffic flow at the IP address or port level (OSI layer 3 or 4), NetworkPolicies allow you to specify rules for traffic flow within your cluster, and also between Pods and the outside world. Your cluster must use a network plugin that supports NetworkPolicy enforcement.
Thanks for read my blog if you liked it this blog please like and commend.
Contact me on linkedin
check out my GitHub for more resource GitHub


